Difference between revisions of "Model2"
| (44 intermediate revisions by 5 users not shown) | |||
| Line 17: | Line 17: | ||
===DemulShooter=== | ===DemulShooter=== | ||
Download from the [https://github.com/argonlefou/DemulShooter/releases DemulShooter GitHub] | Download from the [https://github.com/argonlefou/DemulShooter/releases DemulShooter GitHub] | ||
| + | |||
| + | * DemulShooter works for both 1 and 2-Players setups. | ||
| + | * 4:3 Sinden border is required when using DemulShooter. | ||
| + | * Follow the [[Demulshooter |'''DemulShooter Setup Page''']]. | ||
| + | |||
===Model 2 Sinden Bezel Pack=== | ===Model 2 Sinden Bezel Pack=== | ||
| − | + | You will find all bezels in the [[Sinden Bezel Packs|'''Sinden Bezel Packs''']] page. | |
| − | + | ||
| + | Use the Model 2 Bezel Pack if you have issues displaying the Sinden border. | ||
| + | |||
| + | The Bezel Pack comes with the white flash removal and DemulShooter crosshairs already integrated into the lua scripts. | ||
| + | |||
| + | Follow the included instructions. | ||
===White Flash removal scripts=== | ===White Flash removal scripts=== | ||
====DemulShooter==== | ====DemulShooter==== | ||
| − | DemulShooter now comes with white flash removal scripts built in. | + | DemulShooter now comes with white flash removal lua scripts built in. Installation details can be found at the [https://github.com/argonlefou/DemulShooter/wiki/Configuration#m2emulator- DemulShooter GitHub wiki site] |
| + | |||
| + | * The lua scripts also include crosshairs which can be turned on/off. | ||
| + | |||
====House of the Dead==== | ====House of the Dead==== | ||
Download from [https://www.youtube.com/watch?v=yHk3Gq3mkhk YouTube] | Download from [https://www.youtube.com/watch?v=yHk3Gq3mkhk YouTube] | ||
====Virtua Cop 1 & 2==== | ====Virtua Cop 1 & 2==== | ||
Download from [https://www.youtube.com/watch?v=GuZhgG-UZII YouTube] | Download from [https://www.youtube.com/watch?v=GuZhgG-UZII YouTube] | ||
| + | |||
| + | === RamjetM2Borderless program === | ||
| + | Use this if having issues with shooting offscreen, closing the emulator | ||
| + | |||
| + | Download from [http://forum.arcadecontrols.com/index.php?topic=121412.0 Arcade Controls Forum] | ||
==Setup Guide== | ==Setup Guide== | ||
=== The Basics === | === The Basics === | ||
| − | + | Download and extract the Model 2 Emulator v1.1a from the [https://segaretro.org/Model_2_Emulator SegaRetro website] | |
| − | ''' | + | '''FOR 2 Player''' - Download and setup DemulShooter as described in the links above |
| − | + | Before running the emulator, open the EMULATOR.INI file with a text editor | |
| − | + | Set your [RomDirs] to the location of your games. Remove the ';' at the beginning of the Dir1 line.<syntaxhighlight lang="ini"> | |
;Add your rom directories here (max 10) | ;Add your rom directories here (max 10) | ||
;ROMS subdirectory in the same folder than the exe is always scanned when searching for roms | ;ROMS subdirectory in the same folder than the exe is always scanned when searching for roms | ||
| Line 42: | Line 60: | ||
[RomDirs] | [RomDirs] | ||
;Dir1=c:\Model2\roms | ;Dir1=c:\Model2\roms | ||
| − | </syntaxhighlight> | + | </syntaxhighlight> |
| + | |||
| + | === EMULATOR.INI Settings === | ||
| + | Run emulator_multicpu.exe - this will populate the remaining settings within EMULATOR.INI | ||
| − | + | Close the Model 2 emulator | |
| − | + | Open EMULATOR.INI | |
| − | + | Search for the settings below within your EMULATOR.INI file and set as appropriate <syntaxhighlight lang="ini"> | |
| + | ForceSync=1 [should be set if you're having trouble with screen tear] | ||
| − | + | WideScreenWindow=0 or 1 or 2 [ 0=4:3 correct aspect fullscreen | 1=Stretched 16:9 fullscreen | 2=Stretched 16:10 fullscreen] - Only works with GUI set resolutions, if using modern resolutions (1920x1080) this will have no effect and LUA scripts are required. | |
| − | + | FullScreenWidth=[Native width of your monitor] | |
| − | + | FullScreenHeight=[Native height of your monitor] | |
| − | + | DrawCross=0 or 1 [Enable or disable crosshairs, NOT compatible with DemulShooter, set to 0 and check the DemulShooter wiki for installing crosshairs if you want them] | |
| − | - | + | UseRawInput=0 or 1 [Limited functionality - It locks the mouse to the game screen, preventing issues when shooting offscreen or edges, and allows 2 player mouse but is buggy] |
| + | ;Notes regarding UseRawInput | ||
| + | ;Mouse IDs change randomly after reboots, and unplugging the ID number set as RawDevP1/P2 may need changing | ||
| − | + | ;SET to 0 if using DemulShooter for 2-Player (DemulShooter will also work for 1-Player) | |
| − | + | ;SET to 1 For 1-Player (no DemulShooter) if your are happy to adjust Mouse IDs AND are having issues with shooting offscreen and the emulator closing | |
| − | [[File:M2-Settings.png| | + | ;SET to 0 for 1-Player (using DemulShooter), and if having issues with shooting offscreen, closing the emulator, use RamjetM2Borderless program |
| + | </syntaxhighlight>Save the EMULATOR.INI file | ||
| + | [[File:M2-Settings.png|alt=Example EMULATOR.INI file with settings listed in code block above highlighted|none|thumb|Example EMULATOR.INI file]] | ||
| − | + | === Launching Games === | |
| + | Run emulator_multicpu.exe from your Model2 folder | ||
| − | + | The Model 2 Emulator main window will display | |
Open the "Emulator" tab and "Load Rom" to test your games load | Open the "Emulator" tab and "Load Rom" to test your games load | ||
| Line 74: | Line 101: | ||
[[File:M2-Load-Rom.png|frameless|alt=|470x470px]] | [[File:M2-Load-Rom.png|frameless|alt=|470x470px]] | ||
| − | + | === Video Settings === | |
| + | Select Video from the menu bar | ||
| − | + | Select Fullscreen Resolution | |
| − | <br /> | + | [[File:M2-VideoSettings.png|frameless|alt=|450x450px]]<br />If your display matches one of the listed options select it. Alternately select 'Custom (Set in .ini)' to use the resolution previously set in the INI file. |
| − | + | Aspect ratio for each resolution: | |
| − | '''1280x1024''' | + | * '''640x480 / 800x600 / 1024x768''' - '''4:3''' aspect ratio |
| + | * '''1280x1024''' - '''5:4''' aspect ratio. ''5:4 is closer to native AR of the Model2 arcade hardware '''(496x384)''''' | ||
| + | * '''Custom (Set in .ini)''' = the resolution set previously in EMULATOR.INI e.g.1920x1080, for example | ||
| − | + | If using 1920x1024 it is recommended to install the [[Sinden Bezel Packs#SEGA M2 Bezel Pack|M2 Sinden Bezel Pack]] this adds a border using artwork created by the Sinden community | |
| − | '' | + | '''Switch to Fullscreen''' - loads the game in borderless exclusive full screen (Win7) so the Sinden border may not display. LUA scripts are required for the border in this case |
| − | '''Switch to Fullscreen''' | + | '''Auto Switch to Fullscreen''' - will load games automatically in full screen while the option is ticked (only set once all other settings have been completed) |
| − | + | === Controls & Calibration === | |
| − | + | ==== Setting Controls ==== | |
| + | Controls can only be set up after a game is launched | ||
| − | + | Select Game | |
| − | + | Select 'Configure Controls' | |
| − | + | Set controls for your setup | |
| − | + | Make note of setting for Test Menu (default F2) | |
| − | [[File:M2 | + | Select Close |
| + | [[File:M2ControlsConfig.png|alt=M2 Controls configuration window|none|thumb]] | ||
| − | + | ==== Test Menu ==== | |
| + | The Test Menus of Model 2 lightgun games are very important for the calibration of the lightguns. It's best to spend some time getting your calibration spot on before playing; calibration success will depend on how you play your games onscreen ''(Fullscreen/windowed/4:3/16:9 etc)'' | ||
| − | + | Access the Test Menu by pressing the TEST button assigned under controls (default F2) | |
| − | + | ||
| − | Access the | + | Navigate with the buttons described onscreen ''(Scroll with Service button (F1) and Select with Test (F2) button for example)'' |
| + | [[File:M2-TestMenu.png|alt=House of the Dead Test Menu|none|thumb|HOTD Test Menu]] | ||
| + | From here, you can set the game region, test inputs, and calibrate your gun(s) | ||
| + | |||
| + | ==== Game Region ==== | ||
| + | If the game is in Japanese, Press F1 to cycle to GAME ASSIGNMENTS > Change to USA > Press F2 | ||
| + | |||
| + | ==== Gun Calibration ==== | ||
| + | Go to GUN SETTING | ||
| + | |||
| + | Select 'PLAYER1 GUN ADJUSTMENT' | ||
| + | [[File:M2GunSetting.png|alt=M2 Gun setting menu with PLAYER1 GUN ADJUSTMENT highlighted|none|thumb]] | ||
| + | Make sure the Sinden software is running and the border is up | ||
| + | |||
| + | Shoot each target as indicated on-screen | ||
| + | [[File:M2ShootGrid.png|alt=M2 gun calibration screen|none|thumb]] | ||
| + | Press TEST or Player 1 Start to save | ||
| + | |||
| + | Select PLAYER1 GUN MANUAL ADJUSTMENT | ||
| + | |||
| + | This allows you to fine tune your aim and is recommended for best results | ||
| + | [[File:M2ManualAim.png|alt=PLAYER1 GUN MANUAL ADJUSTMENT screen|none|thumb]] | ||
| + | There are four settings: | ||
| + | |||
| + | * ADXMIN - X axis left hand side | ||
| + | * ADYMIN - Y axis bottom of screen | ||
| + | * ADXMAX - X axis right of the screen | ||
| + | * ADYMAX - Y axis top of the screen | ||
| + | [[File:M2ManualAimADXMIN.png|alt=PLAYER1 GUN MANUAL ADJUSTMENT menu with ADXMIN selected and gun mark on centre left of screen|none|thumb]] | ||
| + | With the border up, select ADXMIN and aim the gun at the screen to the centre left of the screen | ||
| + | |||
| + | A blue gun mark should be moving across the screen (when setting up PLAYER2 this mark will be pink) | ||
| + | |||
| + | [[File:M2GunMark.png|alt=M2 blue gun mark|frameless]] | ||
| + | |||
| + | Using PLAYER1 START (default 1) and PLAYER2 START (default 2) decrease or increase the value so the on screen crosshair (not the emulator crosshair, this should be off) so the mark moves in line with the gun's aim down the sights | ||
| + | |||
| + | Repeat for ADYMIN but aiming at the centre bottom of the screen | ||
| + | [[File:M2ManualAimADYMIN.png|alt=PLAYER1 GUN MANUAL ADJUSTMENT menu with ADYMIN selected and gun mark on centre bottom of screen|none|thumb]] | ||
| + | |||
| + | Repeat for ADXMAX but aiming at the centre right of the screen | ||
| + | [[File:M2ManualAimADXMAX.png|alt=PLAYER1 GUN MANUAL ADJUSTMENT menu with ADXMAX selected and gun mark on centre right of screen|none|thumb]] | ||
| + | |||
| + | Repeat for ADYMAX but aiming at the centre top of the screen | ||
| + | [[File:M2ManualAimADYMAX.png|alt=PLAYER1 GUN MANUAL ADJUSTMENT menu with ADYMAX selected and gun mark on centre top of screen|none|thumb]] | ||
| + | |||
| + | Once done move the gun around the screen, the on screen crosshair should match your gun movements | ||
| + | |||
| + | Select EXIT | ||
| + | |||
| + | Press SERVICE button (default F1) to save the settings | ||
| − | + | If using two guns repeat process in PLAYER2 MANUAL GUN ADJUSTMENT once DemulShooter has been setup. | |
| − | |||
| − | |||
| − | + | Exit the ''Test Menu'' and the calibration settings will be saved to the NVDATA folder in the Model2 folder. | |
| − | + | * Press the Esc key to minimize the game. Then click on ''Emulator'' > ''Exit''. | |
| − | + | * Calibration settings will not be saved if you do not exit the emulator the correct way. | |
| − | ''' | ||
| − | |||
| − | |||
| − | Refer to this video by cybercade 2099 for fine-tuning your calibration | + | ===== Video Example of Manual Calibration ===== |
| + | Refer to this video by cybercade 2099 for a video on fine-tuning your calibration if your aim and crosshair is offset. | ||
<youtube>https://youtu.be/SKspPHrkcTk?t=248</youtube> | <youtube>https://youtu.be/SKspPHrkcTk?t=248</youtube> | ||
| − | |||
| − | |||
== Two-Player Setup with DemulShooter== | == Two-Player Setup with DemulShooter== | ||
| − | ''' | + | '''NOTE:''' Using DemulShooter requires a 4:3 border with 100% Windows scaling. |
| − | + | [https://github.com/argonlefou/DemulShooter/wiki/Model2 '''DemulShooter'''] is required for two players on the Model 2 emulator, but also works for 1-player. | |
| + | |||
| + | * Follow the [[Demulshooter |'''DemulShooter Setup Page''']]. | ||
| + | * Set<span style="font-family:Courier;"> UseRawInput=0 </span>and<span style="font-family:Courier;"> DrawCross=0 </span>in the EMULATOR.ini file | ||
| + | |||
| + | DemulShooter will set the following [https://github.com/argonlefou/DemulShooter/wiki/Model2#controls- '''lightgun inputs''']. | ||
| + | |||
| + | * Trigger = Left Mouse | ||
| + | * Reload = Right Mouse | ||
| + | * Grenade = Middle Mouse (for Behind Enemy Lines) | ||
| + | |||
| + | Install the DemulShooter software and assign P1 and P2 to the USB hardware ID of your guns. | ||
[[File:DS-P1Config.png|frameless|600x600px]] | [[File:DS-P1Config.png|frameless|600x600px]] | ||
| − | Once your guns are set, use a '''Per Game Batch file''' to launch | + | Once your guns are set, use a '''Per Game Batch file or AHK Script''' to launch DemulShooter before launching your game. |
| + | |||
| + | DemulShooter takes over mouse control, default crosshairs generated by M2 emulator are automatically disabled. | ||
| − | + | Crosshairs can be enabled again by installing them from within the [https://github.com/argonlefou/DemulShooter/wiki/Configuration#m2emulator- DemulShooter software]. Optionally with DemulShooter_v10.1.5 onwards, you can disable the white flash of House of the Dead and Virtua Cop games. White flash can also be disabled directly with a standard LUA script | |
| − | < | + | If you have LUA scripts already installed, please back them up before installing the crosshairs from DemulShooter. Any existing LUA scripts will be overwritten. |
| + | |||
| + | * <u>Note</u>: If you are using the Bezel Pack, you can skip this step. DemulShooter crosshairs and white flash removal are already integrated into the Bezel Pack lua scripts. | ||
| + | |||
| + | [[File:DemulShooterGUI Model2.png|frameless]] | ||
| + | |||
| + | ==Example Launch Script== | ||
| + | To create a batch file load notepad and using the following example change the directories to your DemulShooter and M2 emulator directories. | ||
| + | |||
| + | Also be sure to put the relevant [https://github.com/argonlefou/DemulShooter/wiki/Model2 '''rom name'''] at the end. Refer to the [https://github.com/argonlefou/DemulShooter/wiki/Model2 '''DemulShooter github wiki'''] for the correct rom names to use in your scripts. | ||
| + | |||
| + | '''NOTE:''' The only exception is using 'vcop' for DemulShooter when running the ROM 'vcopa' on the emulator. | ||
| + | |||
| + | Once you are finished save the file with whatever name you like but make sure you end it with .BAT before pressing save. | ||
| + | |||
| + | Make sure that the batch file is located inside of the same folder where the emulator_multicpu.exe file is located. | ||
| − | + | Example Text for Batch File: <syntaxhighlight lang="bat"> | |
| − | + | Start C:\YOUR DEMULSHOOTER DIRECTORY\DemulShooter.exe -target=model2 -rom=ROMNAME | |
| − | ''' | + | Start C:\YOUR SEGA MODEL 2 EMU DIRECTORY\emulator_multicpu.exe ROMNAME |
| + | </syntaxhighlight> | ||
| + | |||
| + | <syntaxhighlight lang="bat"> | ||
| + | Start C:\YOUR DEMULSHOOTER DIRECTORY\DemulShooter.exe -target=model2 -rom=hotd | ||
| + | Start C:\YOUR SEGA MODEL 2 EMU DIRECTORY\emulator_multicpu.exe hotd | ||
| + | </syntaxhighlight> | ||
| + | |||
| + | === Sample AutoHotKey (AHK) Script === | ||
| + | *Install [https://www.sindenwiki.org/wiki/AHK '''AutoHotkey'''] | ||
| + | *Run DemulShooter.exe as [https://github.com/argonlefou/DemulShooter/wiki/Usage#warning- Administrator] if you have issues with it hooking. The DemulShooter icon in the system tray should be green. | ||
| + | *Edit the paths in the sample ahk script to match your setup. | ||
| + | <syntaxhighlight lang="ahk"> | ||
| + | #NoEnv ; Recommended for performance and compatibility with future AutoHotkey releases. | ||
| + | ; #Warn ; Enable warnings to assist with detecting common errors. | ||
| + | SendMode Input ; Recommended for new scripts due to its superior speed and reliability. | ||
| + | SetWorkingDir %A_ScriptDir% ; Ensures a consistent starting directory. | ||
| + | |||
| + | #SingleInstance Force | ||
| + | SetWorkingDir D:\SegaModel2 | ||
| − | == | + | Run, D:\DemulShooter\DemulShooter.exe -target=model2 -rom=hotd, D:\DemulShooter |
| − | |||
| − | + | sleep, 1000 | |
| + | Run, D:\SegaModel2\emulator_multicpu.exe - hotd | ||
| − | + | $Esc:: | |
| + | Process,Close,emulator_multicpu.exe | ||
| + | Run,taskkill /im "emulator_multicpu.exe" /F | ||
| + | Run,taskkill /im "DemulShooter.exe" /F | ||
| + | sleep, 2000 | ||
| + | ExitApp | ||
| + | return | ||
| + | </syntaxhighlight> | ||
==Troubleshooting== | ==Troubleshooting== | ||
===Crashes=== | ===Crashes=== | ||
| − | * If you have any issues with the emulator crashing, check the | + | * If you have any issues with the emulator crashing, check the DirectX run times are installed on your machine, the web installer to download all required runtimes from the [https://www.microsoft.com/en-gb/download/details.aspx?id=35 Microsoft website] |
| − | * If you have issues with the emulator crashing or minimizing when you shoot near the edge of the screen or while performing an offscreen reload, you may need to install the | + | * Edit the EMULATOR.ini file and set ForceManaged=1 to see if this will solve your crashing issue. |
| + | * If you have issues with the emulator crashing or minimizing when you shoot near the edge of the screen or while performing an offscreen reload, you may need to install the [http://forum.arcadecontrols.com/index.php?topic=121412.0 RamjetM2Borderless program] (seems to be an issue with older versions of Windows 7) | ||
===Letterbox Mode=== | ===Letterbox Mode=== | ||
| − | If you have issues with | + | If you have issues with games running in non-4:3 letterbox mode when in full screen check your Nvidia Control Panel settings are set to Aspect Ratio |
| − | + | [[File:Nvidia4x3-Scaling.png|alt=|none|thumb]] | |
| − | [[File:Nvidia4x3-Scaling.png| | ||
| − | |||
| − | |||
| − | |||
| − | |||
| − | |||
| − | |||
| − | |||
===Screen tearing/Texture flicker=== | ===Screen tearing/Texture flicker=== | ||
| − | If you see graphics issues mainly horizontal misalignments in textures, make sure the option <code>ForceSync</code> is turned on within the | + | If you see graphics issues mainly horizontal misalignments in textures, make sure the option <code>ForceSync</code> is turned on within the EMULATOR.INI file. |
<code>ForceSync = 1</code> | <code>ForceSync = 1</code> | ||
| + | === Rail Chase 2 === | ||
| + | The aim is offset and there is no ''Test Menu'' calibration to correct this. | ||
[[Category:Emulators PC]] | [[Category:Emulators PC]] | ||
Latest revision as of 16:59, 16 June 2024
Model 2 Emulator is a closed-source Sega Model 2 emulator for Windows written by Miguel Ãngel Horna, otherwise popularly known by his nick "ElSemi".
Downloads
Model 2 Emulator
Download from SegaRetro
DemulShooter
Download from the DemulShooter GitHub
- DemulShooter works for both 1 and 2-Players setups.
- 4:3 Sinden border is required when using DemulShooter.
- Follow the DemulShooter Setup Page.
Model 2 Sinden Bezel Pack
You will find all bezels in the Sinden Bezel Packs page.
Use the Model 2 Bezel Pack if you have issues displaying the Sinden border.
The Bezel Pack comes with the white flash removal and DemulShooter crosshairs already integrated into the lua scripts.
Follow the included instructions.
White Flash removal scripts
DemulShooter
DemulShooter now comes with white flash removal lua scripts built in. Installation details can be found at the DemulShooter GitHub wiki site
- The lua scripts also include crosshairs which can be turned on/off.
House of the Dead
Download from YouTube
Virtua Cop 1 & 2
Download from YouTube
RamjetM2Borderless program
Use this if having issues with shooting offscreen, closing the emulator
Download from Arcade Controls Forum
Setup Guide
The Basics
Download and extract the Model 2 Emulator v1.1a from the SegaRetro website
FOR 2 Player - Download and setup DemulShooter as described in the links above
Before running the emulator, open the EMULATOR.INI file with a text editor
Set your [RomDirs] to the location of your games. Remove the ';' at the beginning of the Dir1 line.
;Add your rom directories here (max 10)
;ROMS subdirectory in the same folder than the exe is always scanned when searching for roms
;(remove the ; form Dir1)
[RomDirs]
;Dir1=c:\Model2\roms
EMULATOR.INI Settings
Run emulator_multicpu.exe - this will populate the remaining settings within EMULATOR.INI
Close the Model 2 emulator
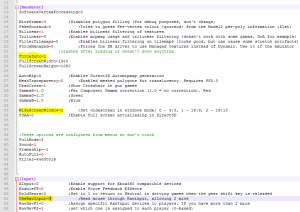
Open EMULATOR.INI
Search for the settings below within your EMULATOR.INI file and set as appropriate
ForceSync=1 [should be set if you're having trouble with screen tear]

WideScreenWindow=0 or 1 or 2 [ 0=4:3 correct aspect fullscreen | 1=Stretched 16:9 fullscreen | 2=Stretched 16:10 fullscreen] - Only works with GUI set resolutions, if using modern resolutions (1920x1080) this will have no effect and LUA scripts are required.

FullScreenWidth=[Native width of your monitor]

FullScreenHeight=[Native height of your monitor]

DrawCross=0 or 1 [Enable or disable crosshairs, NOT compatible with DemulShooter, set to 0 and check the DemulShooter wiki for installing crosshairs if you want them]

UseRawInput=0 or 1 [Limited functionality - It locks the mouse to the game screen, preventing issues when shooting offscreen or edges, and allows 2 player mouse but is buggy]
;Notes regarding UseRawInput
;Mouse IDs change randomly after reboots, and unplugging the ID number set as RawDevP1/P2 may need changing

;SET to 0 if using DemulShooter for 2-Player (DemulShooter will also work for 1-Player)

;SET to 1 For 1-Player (no DemulShooter) if your are happy to adjust Mouse IDs AND are having issues with shooting offscreen and the emulator closing

;SET to 0 for 1-Player (using DemulShooter), and if having issues with shooting offscreen, closing the emulator, use RamjetM2Borderless program
Save the EMULATOR.INI file
Launching Games
Run emulator_multicpu.exe from your Model2 folder
The Model 2 Emulator main window will display
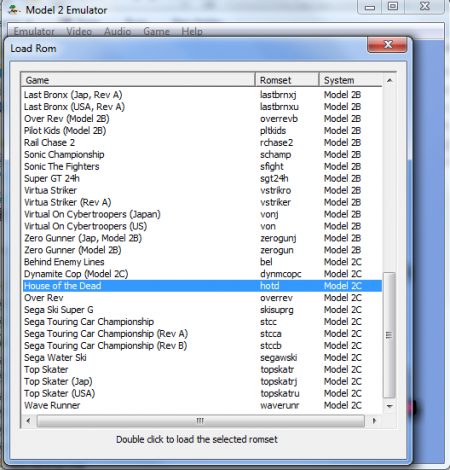
Open the "Emulator" tab and "Load Rom" to test your games load
Video Settings
Select Video from the menu bar
Select Fullscreen Resolution

If your display matches one of the listed options select it. Alternately select 'Custom (Set in .ini)' to use the resolution previously set in the INI file.
Aspect ratio for each resolution:
- 640x480 / 800x600 / 1024x768 - 4:3 aspect ratio
- 1280x1024 - 5:4 aspect ratio. 5:4 is closer to native AR of the Model2 arcade hardware (496x384)
- Custom (Set in .ini) = the resolution set previously in EMULATOR.INI e.g.1920x1080, for example
If using 1920x1024 it is recommended to install the M2 Sinden Bezel Pack this adds a border using artwork created by the Sinden community
Switch to Fullscreen - loads the game in borderless exclusive full screen (Win7) so the Sinden border may not display. LUA scripts are required for the border in this case
Auto Switch to Fullscreen - will load games automatically in full screen while the option is ticked (only set once all other settings have been completed)
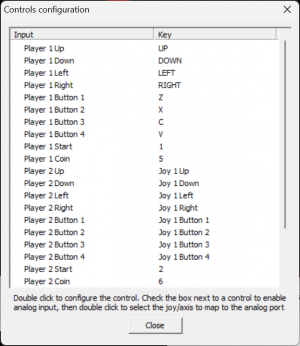
Controls & Calibration
Setting Controls
Controls can only be set up after a game is launched
Select Game
Select 'Configure Controls'
Set controls for your setup
Make note of setting for Test Menu (default F2)
Select Close
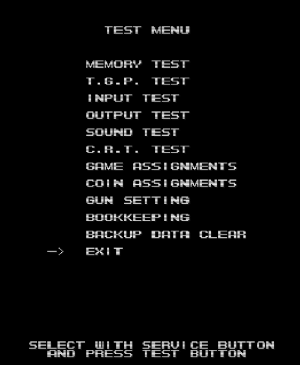
Test Menu
The Test Menus of Model 2 lightgun games are very important for the calibration of the lightguns. It's best to spend some time getting your calibration spot on before playing; calibration success will depend on how you play your games onscreen (Fullscreen/windowed/4:3/16:9 etc)
Access the Test Menu by pressing the TEST button assigned under controls (default F2)
Navigate with the buttons described onscreen (Scroll with Service button (F1) and Select with Test (F2) button for example)
From here, you can set the game region, test inputs, and calibrate your gun(s)
Game Region
If the game is in Japanese, Press F1 to cycle to GAME ASSIGNMENTS > Change to USA > Press F2
Gun Calibration
Go to GUN SETTING
Select 'PLAYER1 GUN ADJUSTMENT'
Make sure the Sinden software is running and the border is up
Shoot each target as indicated on-screen
Press TEST or Player 1 Start to save
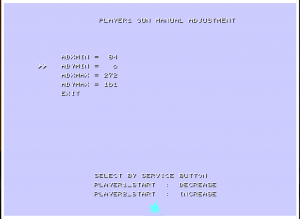
Select PLAYER1 GUN MANUAL ADJUSTMENT
This allows you to fine tune your aim and is recommended for best results
There are four settings:
- ADXMIN - X axis left hand side
- ADYMIN - Y axis bottom of screen
- ADXMAX - X axis right of the screen
- ADYMAX - Y axis top of the screen
With the border up, select ADXMIN and aim the gun at the screen to the centre left of the screen
A blue gun mark should be moving across the screen (when setting up PLAYER2 this mark will be pink)
Using PLAYER1 START (default 1) and PLAYER2 START (default 2) decrease or increase the value so the on screen crosshair (not the emulator crosshair, this should be off) so the mark moves in line with the gun's aim down the sights
Repeat for ADYMIN but aiming at the centre bottom of the screen
Repeat for ADXMAX but aiming at the centre right of the screen
Repeat for ADYMAX but aiming at the centre top of the screen
Once done move the gun around the screen, the on screen crosshair should match your gun movements
Select EXIT
Press SERVICE button (default F1) to save the settings
If using two guns repeat process in PLAYER2 MANUAL GUN ADJUSTMENT once DemulShooter has been setup.
Exit the Test Menu and the calibration settings will be saved to the NVDATA folder in the Model2 folder.
- Press the Esc key to minimize the game. Then click on Emulator > Exit.
- Calibration settings will not be saved if you do not exit the emulator the correct way.
Video Example of Manual Calibration
Refer to this video by cybercade 2099 for a video on fine-tuning your calibration if your aim and crosshair is offset.
Two-Player Setup with DemulShooter
NOTE: Using DemulShooter requires a 4:3 border with 100% Windows scaling.
DemulShooter is required for two players on the Model 2 emulator, but also works for 1-player.
- Follow the DemulShooter Setup Page.
- Set UseRawInput=0 and DrawCross=0 in the EMULATOR.ini file
DemulShooter will set the following lightgun inputs.
- Trigger = Left Mouse
- Reload = Right Mouse
- Grenade = Middle Mouse (for Behind Enemy Lines)
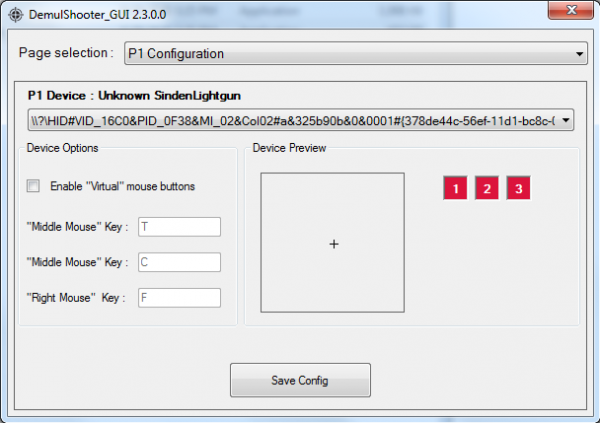
Install the DemulShooter software and assign P1 and P2 to the USB hardware ID of your guns.
Once your guns are set, use a Per Game Batch file or AHK Script to launch DemulShooter before launching your game.
DemulShooter takes over mouse control, default crosshairs generated by M2 emulator are automatically disabled.
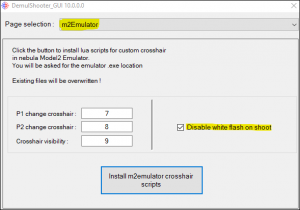
Crosshairs can be enabled again by installing them from within the DemulShooter software. Optionally with DemulShooter_v10.1.5 onwards, you can disable the white flash of House of the Dead and Virtua Cop games. White flash can also be disabled directly with a standard LUA script
If you have LUA scripts already installed, please back them up before installing the crosshairs from DemulShooter. Any existing LUA scripts will be overwritten.
- Note: If you are using the Bezel Pack, you can skip this step. DemulShooter crosshairs and white flash removal are already integrated into the Bezel Pack lua scripts.
Example Launch Script
To create a batch file load notepad and using the following example change the directories to your DemulShooter and M2 emulator directories.
Also be sure to put the relevant rom name at the end. Refer to the DemulShooter github wiki for the correct rom names to use in your scripts.
NOTE: The only exception is using 'vcop' for DemulShooter when running the ROM 'vcopa' on the emulator.
Once you are finished save the file with whatever name you like but make sure you end it with .BAT before pressing save.
Make sure that the batch file is located inside of the same folder where the emulator_multicpu.exe file is located.
Example Text for Batch File:
Start C:\YOUR DEMULSHOOTER DIRECTORY\DemulShooter.exe -target=model2 -rom=ROMNAME
Start C:\YOUR SEGA MODEL 2 EMU DIRECTORY\emulator_multicpu.exe ROMNAME
Start C:\YOUR DEMULSHOOTER DIRECTORY\DemulShooter.exe -target=model2 -rom=hotd
Start C:\YOUR SEGA MODEL 2 EMU DIRECTORY\emulator_multicpu.exe hotd
Sample AutoHotKey (AHK) Script
- Install AutoHotkey
- Run DemulShooter.exe as Administrator if you have issues with it hooking. The DemulShooter icon in the system tray should be green.
- Edit the paths in the sample ahk script to match your setup.
#NoEnv  ; Recommended for performance and compatibility with future AutoHotkey releases.
; #Warn  ; Enable warnings to assist with detecting common errors.
SendMode Input  ; Recommended for new scripts due to its superior speed and reliability.
SetWorkingDir %A_ScriptDir%  ; Ensures a consistent starting directory.

#SingleInstance Force

SetWorkingDir D:\SegaModel2

Run, D:\DemulShooter\DemulShooter.exe -target=model2 -rom=hotd, D:\DemulShooter

sleep, 1000
Run, D:\SegaModel2\emulator_multicpu.exe - hotd

$Esc::
    Process,Close,emulator_multicpu.exe
    Run,taskkill /im "emulator_multicpu.exe" /F
    Run,taskkill /im "DemulShooter.exe" /F
    sleep, 2000
    ExitApp
return
Troubleshooting
Crashes
- If you have any issues with the emulator crashing, check the DirectX run times are installed on your machine, the web installer to download all required runtimes from the Microsoft website
- Edit the EMULATOR.ini file and set ForceManaged=1 to see if this will solve your crashing issue.
- If you have issues with the emulator crashing or minimizing when you shoot near the edge of the screen or while performing an offscreen reload, you may need to install the RamjetM2Borderless program (seems to be an issue with older versions of Windows 7)
Letterbox Mode
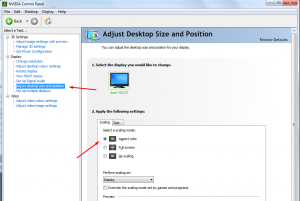
If you have issues with games running in non-4:3 letterbox mode when in full screen check your Nvidia Control Panel settings are set to Aspect Ratio
Screen tearing/Texture flicker
If you see graphics issues mainly horizontal misalignments in textures, make sure the option ForceSync is turned on within the EMULATOR.INI file.
ForceSync = 1
Rail Chase 2
The aim is offset and there is no Test Menu calibration to correct this.
