Difference between revisions of "TeknoParrot"
m (→Games) |
|||
| Line 137: | Line 137: | ||
* Enable ''FreePlay'' or map Coin 1 and Service 1 to the same button. | * Enable ''FreePlay'' or map Coin 1 and Service 1 to the same button. | ||
* AMD Shader Fix: If you have an AMD GPU and are experiencing graphical issues, enable ''AMD Fix'' in TeknoParrot's Game Settings and download the ''AMD Shader Fix'' available in the #fixes channel in the TeknoParrot Discord | * AMD Shader Fix: If you have an AMD GPU and are experiencing graphical issues, enable ''AMD Fix'' in TeknoParrot's Game Settings and download the ''AMD Shader Fix'' available in the #fixes channel in the TeknoParrot Discord | ||
| + | ---- | ||
=== Aliens Armageddon === | === Aliens Armageddon === | ||
| Line 145: | Line 146: | ||
* Reload and Grenade buttons mappings are switched (as of v1.0.0.811) | * Reload and Grenade buttons mappings are switched (as of v1.0.0.811) | ||
* <u>NOTE</u>: This game can crash if you let it load to the title screen. Start the game right away after booting if you have this issue. | * <u>NOTE</u>: This game can crash if you let it load to the title screen. Start the game right away after booting if you have this issue. | ||
| + | ---- | ||
=== Aliens Extermination === | === Aliens Extermination === | ||
| Line 157: | Line 159: | ||
** Do the same for gun 2. | ** Do the same for gun 2. | ||
** Save settings & exit. | ** Save settings & exit. | ||
| + | ---- | ||
=== America's Army === | === America's Army === | ||
| Line 164: | Line 167: | ||
* Edit the<span style="font-family:Courier;"> ArmyOps.ini </span>file and set [SDLDrv.SDLClient] to 640 x 480 | * Edit the<span style="font-family:Courier;"> ArmyOps.ini </span>file and set [SDLDrv.SDLClient] to 640 x 480 | ||
[[File:ArmyOps.ini.png|none|thumb]] | [[File:ArmyOps.ini.png|none|thumb]] | ||
| + | ---- | ||
=== Big Buck Hunter Pro === | === Big Buck Hunter Pro === | ||
| Line 170: | Line 174: | ||
* Confirmed working versions are v1.25 and v1.19 (Home) | * Confirmed working versions are v1.25 and v1.19 (Home) | ||
* Takes a long time to load. | * Takes a long time to load. | ||
| + | ---- | ||
=== Far Cry: Paradise Lost === | === Far Cry: Paradise Lost === | ||
| Line 178: | Line 183: | ||
* Having Steam running in the background has caused the game to crash for some people. | * Having Steam running in the background has caused the game to crash for some people. | ||
* <u>NOTE</u>: Allow the game fully load. The game can crash if you ''"Pull the Trigger to Continue"''. | * <u>NOTE</u>: Allow the game fully load. The game can crash if you ''"Pull the Trigger to Continue"''. | ||
| + | ---- | ||
=== Friction === | === Friction === | ||
* Game File Name: Friction.exe | * Game File Name: Friction.exe | ||
| − | + | ---- | |
=== Gaia Attack 4 === | === Gaia Attack 4 === | ||
* Game File Name: game.exe | * Game File Name: game.exe | ||
* MOVIE READ_ERROR: Apply the ''Codec Fix'' available in the #fixes channel in the TeknoParrot Discord. | * MOVIE READ_ERROR: Apply the ''Codec Fix'' available in the #fixes channel in the TeknoParrot Discord. | ||
| + | ---- | ||
=== Haunted Museum === | === Haunted Museum === | ||
| Line 192: | Line 199: | ||
* Game File Name: game.exe | * Game File Name: game.exe | ||
* MOVIE READ_ERROR: Apply the ''Codec Fix'' available in the #fixes channel in the TeknoParrot Discord. | * MOVIE READ_ERROR: Apply the ''Codec Fix'' available in the #fixes channel in the TeknoParrot Discord. | ||
| + | ---- | ||
=== Haunted Museum 2 === | === Haunted Museum 2 === | ||
| Line 197: | Line 205: | ||
* Game File Name: game.exe | * Game File Name: game.exe | ||
* MOVIE READ_ERROR: Apply the ''Codec Fix'' available in the #fixes channel in the TeknoParrot Discord. | * MOVIE READ_ERROR: Apply the ''Codec Fix'' available in the #fixes channel in the TeknoParrot Discord. | ||
| + | ---- | ||
=== House of the Dead 4 === | === House of the Dead 4 === | ||
| Line 211: | Line 220: | ||
* Download Power ISO from the [https://www.poweriso.com/download.php PowerISO website] | * Download Power ISO from the [https://www.poweriso.com/download.php PowerISO website] | ||
| + | ---- | ||
=== House of the Dead 4 Special === | === House of the Dead 4 Special === | ||
* Game File Name: hod4M.elf | * Game File Name: hod4M.elf | ||
* <u>Optional Shader Fix</u>: Apply the ''HOTD 4 Special Shader Fix'' available in the #fixes channel in the TeknoParrot Discord. | * <u>Optional Shader Fix</u>: Apply the ''HOTD 4 Special Shader Fix'' available in the #fixes channel in the TeknoParrot Discord. | ||
| − | + | ---- | |
=== House of the Dead: Scarlet Dawn === | === House of the Dead: Scarlet Dawn === | ||
| Line 232: | Line 242: | ||
* Apply ''Nezarn's Win 7 Fix'' available in the #fixes-channel in the TeknoParrot Discord. | * Apply ''Nezarn's Win 7 Fix'' available in the #fixes-channel in the TeknoParrot Discord. | ||
| + | ---- | ||
=== House of the Dead EX === | === House of the Dead EX === | ||
| Line 243: | Line 254: | ||
* Set ''Region'' and ''Dongle'' = Export or Japan (game will crash if set to USA) | * Set ''Region'' and ''Dongle'' = Export or Japan (game will crash if set to USA) | ||
| − | + | ---- | |
=== Let's Go Island === | === Let's Go Island === | ||
| Line 251: | Line 262: | ||
**[https://mega.nz/#!0IZFBYLC!wEZjB0JHHLlrevxndr6i6rKNuRIO0YACkrS7r4WCt9w Non 3D version] | **[https://mega.nz/#!0IZFBYLC!wEZjB0JHHLlrevxndr6i6rKNuRIO0YACkrS7r4WCt9w Non 3D version] | ||
** [https://mega.nz/#!BJwjSQDT!5k7ArK2VnVyeq94Dp6VonR7Al_SoWijnjc1jzogaKZg 3D version] | ** [https://mega.nz/#!BJwjSQDT!5k7ArK2VnVyeq94Dp6VonR7Al_SoWijnjc1jzogaKZg 3D version] | ||
| − | + | ---- | |
=== Lets Go Jungle === | === Lets Go Jungle === | ||
| Line 258: | Line 269: | ||
* Download the ''AMD Shader Fix'' from [https://cdn.discordapp.com/attachments/434687521805303810/552899763230736386/lgj_amd_fix.7z TeknoParrot Discord] | * Download the ''AMD Shader Fix'' from [https://cdn.discordapp.com/attachments/434687521805303810/552899763230736386/lgj_amd_fix.7z TeknoParrot Discord] | ||
** Enable AMD Fix in the Game Settings. | ** Enable AMD Fix in the Game Settings. | ||
| + | ---- | ||
=== Lost Land Adventure === | === Lost Land Adventure === | ||
| Line 267: | Line 279: | ||
* Optional: Download the ''English Patch'' from [https://mega.nz/file/arYhSLrA#6MY_C5jbn9gTubOWv95swYerz4btjg8gTKN_Yn4qnLU Mega.nz] and follow the included instructions. | * Optional: Download the ''English Patch'' from [https://mega.nz/file/arYhSLrA#6MY_C5jbn9gTubOWv95swYerz4btjg8gTKN_Yn4qnLU Mega.nz] and follow the included instructions. | ||
* Optional: Download the ''Dome Fix'' from [https://mega.nz/file/6jYEQbxL#GEdaLNAoc464FVz1q9cbAnB7ToULnQTSwT1_dRv9SMw Mega.nz] and follow the included instructions. | * Optional: Download the ''Dome Fix'' from [https://mega.nz/file/6jYEQbxL#GEdaLNAoc464FVz1q9cbAnB7ToULnQTSwT1_dRv9SMw Mega.nz] and follow the included instructions. | ||
| − | + | ---- | |
=== Luigi's Mansion === | === Luigi's Mansion === | ||
| Line 318: | Line 330: | ||
==== Shader Issue ==== | ==== Shader Issue ==== | ||
Set the [https://support.microsoft.com/en-us/windows/make-older-apps-or-programs-compatible-with-windows-783d6dd7-b439-bdb0-0490-54eea0f45938 Compatibility Mode] for VACUUM.exe to Windows 7 or Windows 8. | Set the [https://support.microsoft.com/en-us/windows/make-older-apps-or-programs-compatible-with-windows-783d6dd7-b439-bdb0-0490-54eea0f45938 Compatibility Mode] for VACUUM.exe to Windows 7 or Windows 8. | ||
| + | ---- | ||
=== Operation GHOST === | === Operation GHOST === | ||
| Line 385: | Line 398: | ||
# Click Save - All other options are set to default | # Click Save - All other options are set to default | ||
# To run the game run "Game Loader All RH.exe" | # To run the game run "Game Loader All RH.exe" | ||
| + | ---- | ||
=== Primeval Hunt === | === Primeval Hunt === | ||
| Line 395: | Line 409: | ||
* Apply ''Nezarn's Shader Fix'' available in the #fixes channel in the TeknoParrot Discord. | * Apply ''Nezarn's Shader Fix'' available in the #fixes channel in the TeknoParrot Discord. | ||
| − | + | ---- | |
=== Rabbids Hollywood Arcade === | === Rabbids Hollywood Arcade === | ||
| Line 401: | Line 415: | ||
* Requires the ''Trigger Fix'', which can be found in the #fixes channel in the TeknoParrot Discord. | * Requires the ''Trigger Fix'', which can be found in the #fixes channel in the TeknoParrot Discord. | ||
* Refer to the [[Reshade#Home_Key_Issue|ReShade workaround]] if you have issues loading the ReShade menu screen when pressing the Home key. | * Refer to the [[Reshade#Home_Key_Issue|ReShade workaround]] if you have issues loading the ReShade menu screen when pressing the Home key. | ||
| + | ---- | ||
=== Rambo === | === Rambo === | ||
| Line 418: | Line 433: | ||
* Apply ''Nezarn's Shader Fix'' available in the #fixes channel in the TeknoParrot Discord. | * Apply ''Nezarn's Shader Fix'' available in the #fixes channel in the TeknoParrot Discord. | ||
* This shader fix was created for older NVIDIA cards. | * This shader fix was created for older NVIDIA cards. | ||
| + | ---- | ||
=== Sega Dream Raiders === | === Sega Dream Raiders === | ||
| Line 428: | Line 444: | ||
[[File:DreamRaidersGame.ini.png|none|thumb]] | [[File:DreamRaidersGame.ini.png|none|thumb]] | ||
| − | + | ---- | |
=== Sega Golden Gun === | === Sega Golden Gun === | ||
| Line 434: | Line 450: | ||
* Download ''No Crosshair Patch'' from [https://mega.nz/file/AVhAmCDR#MTo-q7wVfm1Jdypq2HTvUk4RbeP5y1Ss1d2JwstOr-w Mega.nz] | * Download ''No Crosshair Patch'' from [https://mega.nz/file/AVhAmCDR#MTo-q7wVfm1Jdypq2HTvUk4RbeP5y1Ss1d2JwstOr-w Mega.nz] | ||
* Enable ''FreePlay'' or map Coin 1 and Service 1 to the same button. | * Enable ''FreePlay'' or map Coin 1 and Service 1 to the same button. | ||
| + | ---- | ||
=== Star Trek Voyager === | === Star Trek Voyager === | ||
| Line 450: | Line 467: | ||
* <u>NOTE</u>: Allow the game to load until you get to the title screen. The game can crash if you enable the Sinden border too soon. | * <u>NOTE</u>: Allow the game to load until you get to the title screen. The game can crash if you enable the Sinden border too soon. | ||
| + | ---- | ||
=== Target Terror Gold === | === Target Terror Gold === | ||
| Line 455: | Line 473: | ||
* Game File Name: game | * Game File Name: game | ||
* Takes a long time to boot | * Takes a long time to boot | ||
| + | ---- | ||
=== Terminator Salvation === | === Terminator Salvation === | ||
| Line 467: | Line 486: | ||
* Launch the game and press the ''Test Button''. | * Launch the game and press the ''Test Button''. | ||
* Go to ''Operator Adjustments'' > ''Game Adjustments'' > Change Shooting Mode to ''Default'' or ''Tracer Only'' | * Go to ''Operator Adjustments'' > ''Game Adjustments'' > Change Shooting Mode to ''Default'' or ''Tracer Only'' | ||
| + | ---- | ||
=== Time Crisis 5 === | === Time Crisis 5 === | ||
| Line 472: | Line 492: | ||
* Game File Name: RSLauncher.exe | * Game File Name: RSLauncher.exe | ||
* Crosshair render hook = Present | * Crosshair render hook = Present | ||
| + | ---- | ||
=== Tomb Raider === | === Tomb Raider === | ||
| Line 484: | Line 505: | ||
** Right-click on ''Screenmanager Resolution Height'' > Modify > Edit the Decimal Value Data to 1080. | ** Right-click on ''Screenmanager Resolution Height'' > Modify > Edit the Decimal Value Data to 1080. | ||
** Right-click on ''Screenmanager Resolution Width'' > Modify > Edit the Decimal Value Data to 1920. | ** Right-click on ''Screenmanager Resolution Width'' > Modify > Edit the Decimal Value Data to 1920. | ||
| + | ---- | ||
=== Transformers - Human Alliance === | === Transformers - Human Alliance === | ||
| Line 498: | Line 520: | ||
==== Stage 3 Crash Fix ==== | ==== Stage 3 Crash Fix ==== | ||
If the game crashes for you on stage 3 due to out-of-memory errors, download the ''NTCore 4GB Patch'' from the [https://teknogods.github.io/compatibility/Transformers.htm TeknoGods' GitHub wiki site] and patch the TF_Gun_R_Ring_dumped.exe file. | If the game crashes for you on stage 3 due to out-of-memory errors, download the ''NTCore 4GB Patch'' from the [https://teknogods.github.io/compatibility/Transformers.htm TeknoGods' GitHub wiki site] and patch the TF_Gun_R_Ring_dumped.exe file. | ||
| + | ---- | ||
=== Wartran Troopers === | === Wartran Troopers === | ||
Revision as of 06:44, 26 June 2023
TeknoParrot is a software package allowing you to run selected PC-based arcade titles on your own hardware, with full support for keyboard and mouse controls, gamepads, steering wheels, and joysticks.
Because TP is such a wide-reaching emulator that covers various games and systems, it is at this time not a one-stop setup for every game,
Because of this, each game will have to be covered separately, as each has unique issues. However, many aspects of the basic setup will be the same.
Download
Download TeknoParrot from the TeknoParrot website
TeknoParrot also requires the following available on their Github downloads page:
- DirectX End-User Runtimes (June 2010)
- Visual C++ Redistributable Runtimes All-in-One
Setup Guide
TeknoParrot for the most part is a simple emulator to setup and has come a long way in recent years in terms of its user friendliness.
The below guide applies to all games, however each game will have a different file name and some games will have additional requirements which will be covered further down
Windows Scaling
Set your Windows Scaling to 100% otherwise your aim can be off and the crosshair movements can be limited to a corner section of your screen.
Having a Windows Scaling greater than 100% can also cause issues when mapping the Sinden lightgun.
Initial Setup
Create a folder for installing TeknoParrot
Before installing create an antivirus exemption for this folder as TeknoParrot creates false positive alerts and files may be removed preventing the software from working.
Install the emulator and allow it to update.
Adding Games
NOTE: You need clean dumps of the games. Dumps with hacked/altered game files (such as jconfig) will not run correctly with TeknoParrot.
- Recommend to also create create an antivirus exemption for your TeknoParrot rom's folder(s). The game files can also create false positive alerts.
Click the menu button in the top left corner (3 horizontal black lines)
and then select "Add Game". You can then find the game you want to add, click on it and press "add game" on the right side of the window.
To make life easier be sure to use the "genre" drop down on the right and select "shooter" to make the list smaller!
Once the game has been added you will see it appear in the list in your library.
Configure Settings
Left click the game in the library and then click on "Game Settings" on the right of the window. The screen that pops up will be different for each game and will sometimes change between releases/versions of TeknoParrot.
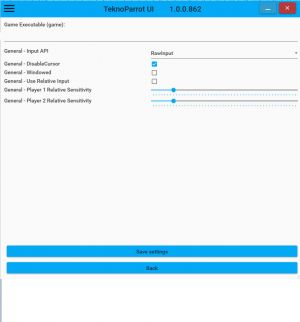
Select the "game executable"
Just underneath where it says "Game Executable" and above the line do a left mouse click and it will bring up a browser window. Navigate to where you saved your extracted game files and select the appropriate file (names bellow under each games heading).
Also make sure "General Input API" is set to "RawInput".
Unless their are any other specifics for the game (see bellow) then press "save settings" and return to the Library.
Configure Controls
Select the game in the list you are setting up
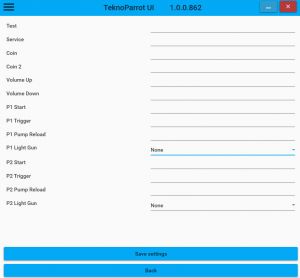
Click "Controller Setup".
This will bring up a different control options for each game but setup works in the same way
Make sure that the Sinden Lightgun is plugged in with the software running and border is up, and you are pointing at the screen (for mapping the trigger).
Select the dropdown next to "P1 Light Gun" and select the gun you wish to use, e.g. "Sinden Lightgun Black"
In the blank box next to each control listed left click inside the box it will say "Press Button or Cancel with ESC" at this point you press the corresponding button you wish to use on your gun/controller etc.
It will then map that button to that action.
Please remember the gun has onscreen and offscreen functions so when you are binding inputs from the gun MAKE SURE you have the border up and you are pointing at the screen for onscreen inputs (such as binding the trigger) or you are pointing outside of the border if you want a offscreen input.
Repeat this process for each control input and for player 2 if desired.
Press the "Save Settings" Button.
The game should now be ready to run
Back on the Library screen all you should need to do now is select the game and press the "Launch Game" Button to start the game.
Fullscreen Problems
IMPORTANT NOTE ABOUT FULLSCREEN RESOLUTION
TeknoParrot developer Harm has traced the issue of the screen res problems on some games (Golden Gun, Transformers, Star Trek, HOTD4) to the monitor frequency. So if you have a 144Hz monitor, it will not run full screen. If you can reduce the Hz to 60 or play on another monitor, it will load full screen!
Sinden Border Issues
Use ReShade if you have issues displaying the Sinden border.
Troubleshooting
The Sinden lightgun may stop working correctly after a TeknoParrot update, Sinden lightgun firmware update, or you plug your guns into a different usb port. Try one the following solutions:
1 - In TeknoParrot's Controller Settings, change Player 1 Lightgun from the "Sinden Lightgun" to another device and click on Save.
- Then go back into the Controller Settings and change Player 1 Lightgun back to the "Sinden Lightgun".
2 - If the above solution does not work for you, delete the game's xml file located inside of TeknoParrot's UserProfiles folder and start over.
AutoHotKey Script (AHK)
To launch a TeknoParrot game using an AHK script, point to the game's xml file located in the UserProfiles folder.
Below is an example AHK script to launch Aliens Extermination.
#NoEnv  ; Recommended for performance and compatibility with future AutoHotkey releases.
; #Warn  ; Enable warnings to assist with detecting common errors.
SendMode Input  ; Recommended for new scripts due to its superior speed and reliability.
SetWorkingDir %A_ScriptDir%  ; Ensures a consistent starting directory.

#SingleInstance Force

Run, D:\Teknoparrot\TeknoParrotUi.exe --profile=AliensExtermination.xml

~Esc::
    Process,Close,TeknoParrotUi.exe
    Run,taskkill /im "TeknoParrotUi.exe" /F
    sleep, 2000
    ExitApp
Return
Games
2 Spicy
- Game File Name: apacheM.elf located in \elf\ folder.
- Display mode = Fullscreen Windowed
- Enable FreePlay or map Coin 1 and Service 1 to the same button.
- AMD Shader Fix: If you have an AMD GPU and are experiencing graphical issues, enable AMD Fix in TeknoParrot's Game Settings and download the AMD Shader Fix available in the #fixes channel in the TeknoParrot Discord
Aliens Armageddon
- Game File Name: game
- Confirmed working version for both game & hasp is v3.90
- Use Nomousy to hide the mouse cursor.
- Reload and Grenade buttons mappings are switched (as of v1.0.0.811)
- NOTE: This game can crash if you let it load to the title screen. Start the game right away after booting if you have this issue.
Aliens Extermination
- Game File Name: aliens dehasped.exe or aliens.exe
- Download No Crosshair Patch from Mega.nz
- Copy & paste the patch into the DATA folder (ex. D:\Aliens Extermination\aliens\DATA\permHQ.tga)
- If you have issues with the game running too fast, see if you can enable V-sync settings in your GFX cards control panel, such as enhanced sync on AMD cards or limit the frame rate.
- Having Steam running in the background has caused the game to run extremely slow for some people.
- If your aim is off, calibrate your lightguns in the Test Menu.
- Press the Test button > use Volume buttons & choose System Tests Menu and press the Select button to enter > select Gun Test & Calibrate > press P1 Start button to calibrate gun 1.
- Do the same for gun 2.
- Save settings & exit.
America's Army
- Game File Name: armyops-bin
- Disable Windowed in TeknoParrot's America's Army Game Settings menu.
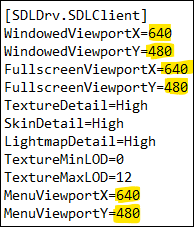
- Edit the ArmyOps.ini file and set [SDLDrv.SDLClient] to 640 x 480
Big Buck Hunter Pro
- Game File Name: game
- Confirmed working versions are v1.25 and v1.19 (Home)
- Takes a long time to load.
Far Cry: Paradise Lost
- Game File Name: Farcry_R.exe
- Download No Crosshair Patch from Mega.nz
- Copy & paste the patch into the game's root folder (ex. D:\Far Cry\common.dat)
- Having Steam running in the background has caused the game to crash for some people.
- NOTE: Allow the game fully load. The game can crash if you "Pull the Trigger to Continue".
Friction
- Game File Name: Friction.exe
Gaia Attack 4
- Game File Name: game.exe
- MOVIE READ_ERROR: Apply the Codec Fix available in the #fixes channel in the TeknoParrot Discord.
Haunted Museum
- Game File Name: game.exe
- MOVIE READ_ERROR: Apply the Codec Fix available in the #fixes channel in the TeknoParrot Discord.
Haunted Museum 2
- Game File Name: game.exe
- MOVIE READ_ERROR: Apply the Codec Fix available in the #fixes channel in the TeknoParrot Discord.
House of the Dead 4
- Game File Name: hod4M.elf Located in \Disk0\elf\ folder.
- Off-screen reload hack = Enabled
- Display Mode = Full screen windowed
- Resolution = set as required (Native resolution is 1280x768)
- Optional Shader Fix: Apply the HOTD 4 Shader Fix from Mega.nz
If you have the hotd4.bin file you will need to extract the files from it first using Power ISO.
To do so install power ISO then right click the hotd4.bin file, move your mouse down over the power ISO selection then select extract from the pop up.
- Download Power ISO from the PowerISO website
House of the Dead 4 Special
- Game File Name: hod4M.elf
- Optional Shader Fix: Apply the HOTD 4 Special Shader Fix available in the #fixes channel in the TeknoParrot Discord.
House of the Dead: Scarlet Dawn
- Game File Name: Hodzero-Win64-Shipping.exe
- Second File Name: amdaemon.exe
- Game must be run in 1920x1080 resolution; otherwise, the aim will be off.
- If you get missing DLL errors, download and install the AIO C++ runtime pack from Major Geeks website
Graphics Settings
- Resolution and Quality be adjusted via INI settings. Goondam created a few profiles as a base point that can be adjusted. Readme for installation and directions in the zip.
- Download from Dropbox
Windows 7
- Apply Nezarn's Win 7 Fix available in the #fixes-channel in the TeknoParrot Discord.
House of the Dead EX
- Game File Name: hodexRI.elf
- Copy & paste the following two files from the game's elf folder into Teknoparrot's ElfLdr2 libs folder.
- librnalindbergh_jr.so
- libcri_soundoutput_lindbergh_jr.so
- HOTD EX\disc0\elf => TeknoParrot\ElfLdr2\libs
- Set Region and Dongle = Export or Japan (game will crash if set to USA)
Let's Go Island
- Game File Name: LGI.exe
- The buttons required for the QTE events in the game are Player 1 & 2 Start, so make sure you set both buttons to P1's gun if you are playing solo
- Download No Crosshair Patches:
Lets Go Jungle
- Game File Name: LGJ_Final
- The buttons required for the QTE events in the game are Player 1 & 2 Start, so make sure you set both buttons to P1's gun if you are playing solo.
- Download the AMD Shader Fix from TeknoParrot Discord
- Enable AMD Fix in the Game Settings.
Lost Land Adventure
- Game File Name: RSLauncher.exe
- Crashing Fix: Apply this fix if you have issues with the game crashing.
- Edit the BaseEngine.ini file and change AutoReloadChangedShaders = False
- Game Folder\LLA\Engine\Config\BaseEngine.ini
- Optional: Download the English Patch from Mega.nz and follow the included instructions.
- Optional: Download the Dome Fix from Mega.nz and follow the included instructions.
Luigi's Mansion
- Game File Name: VACUUM.exe
- General-Windowed = Enabled
Border Issue Fix
If you are having trouble getting the border to overlay with this game, you can follow this guide by Cor094:
Here's how you can use ReShade in Luigi's Mansion using a DLL injector.
One common DLL injector, ENB injector, doesn't seem to work with 64-bit programs like LM.
So, the DLL injector I used was Xenos injector, available for download from DarthTon's github.
Also, due to the nature of injecting DLL files, your antivirus will freak out, and you'll have to add it as an exclusion.
Actually, Google chrome wouldn't even let me download it; I had to use Edge. That's the main reason I hadn't posted a guide yet; I was hoping to find one that was easier to download.
- Install ReShade as you normally would to vacuum.exe in your LM directory. Install as D3D 10/11/12.
- Extract Xenos injector from its 7z file and launch it. There's a regular exe and a 64-bit one; they should both work
- Under the process selection in Xenos, select manual launch.
- Select your vacuum.exe file.
- Under images, click add and select the dxgi.dll file Reshade installed (should be in the same folder as vacuum.exe).
- Select inject, it will then tell you to launch your game.
- Launch LM, and it should work. This has to be done each time, but it can be automated.
When you close Xenos after using it, it automatically creates a profile file with your most recent settings in the same folder as your Xenos exe. You could have AHK or LaunchBox run this profile before launching the game.
When Xenos is launched from a profile, it automatically closes once LM is launched and injected, so you shouldn't need to add anything in your AHK to kill the Xenos process.
Also, people use Xenos to cheat in games, so make sure you don't have it open for whatever reason before launching an online stream game or anything, you might think you're trying to cheat.
Sample AHK Script
Run, D:\Xenos\Xenos64.exe --run "D:\Xenos\XenosCurrentProfile.xpr"

ExitApp
return
Fullscreen Issue
You can use Borderless Gaming if you have issues getting Luigi's Mansion to properly display in fullscreen.
Shader Issue
Set the Compatibility Mode for VACUUM.exe to Windows 7 or Windows 8.
Operation GHOST
- Game File Name: gs2.exe
- Calibrate the lightguns in the Test Menu.
- Set the DongleRegion and PcbRegion to JAPAN in order to save the calibration settings in the Test Menu.
- Download the Crosshair Removal Patch by Argonlefou from Mega.nz
- Extract the 3 file folders into the UI_hud_common folder.
- Download Red Blood Patch by Argonlefou from Mega.nz
- Extract the 3 files into the hit_effect folder.
Additional/Default built in bindings
Left mouse	= trigger
Right mouse	= Reload & action button (Flashbangs & boss fight special)
ctrl+F1		= Coin
ENTER		= P1 Start
NumPad[+]	= P2 Start
Space		= Fast Forward/Skip
F2-F5		= Start missions 2-5
F6		= Show video
Y		= Service
Q		= Toggle help overlay
Operation Ghost with Resolution Patch (Alternative Method #1)
If you have graphical issues running this game in TeknoParrot, you can try this method provided by GepettoZHog.
1 - Edit Operation Ghost’s gs2.ini file and set FullScreen=0
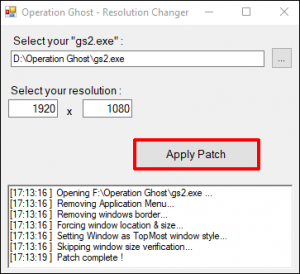
2 - Download the Operation Ghost Resolution Patch and extract all of the contents into your Operation Ghost game folder.
3 - Run the OpGhost_ResChanger.exe file.
- Navigate to and select the gs2.exe file.
- Enter your monitor’s resolution.
- Click on Apply Patch.
4 - Setup & run the game in Teknoparrot.
- Enable Windowed in TeknoParrot's Operation Ghost Game Settings menu.
- Calibrate the lightguns in the Test Menu.
Operation Ghost with GameLoader (Alternative Method #2)
You might need to run a problem with this game's graphics with Game Loader RH, which can be downloaded from Mega.nz (you will get a virus warning about this program)
Setting up Game loader RH
- download Zip from above
- copy all exe files to game directory
- Game Loader Installer.exe
- Game Loader Config.exe
- Game Loader All RH.exe
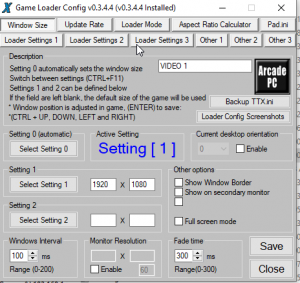
- Run "Game Loader Config.exe" you will get a warning about it being a virus (this is a joke). It should then open a notepad file TTX.ini in C:\Users\"Your User Name"\ AppData\Roaming\Game Loader All RH\ <-- this is the file you should have open change "Warning = Agree"
- Save and close
- Run Game Loader Installer.exe and install it
- Run Game Loader Config.exe
Game Loader setting for Operation Ghost
- Change Res click on select setting 1 and type in your screen res (mine is 1920x1080)
- Update Rate Tab - "Update rate mouse cursor hide" to 0 and tick enable
- Loader Mode Tab - Set to -1
- Loader Setting 1 Tab - Tick "Do not use TeknoParrot"
- Click Save - All other options are set to default
- To run the game run "Game Loader All RH.exe"
Primeval Hunt
- Game File Name: main.exe
- Copy & paste the following two files from the game's prog folder into Teknoparrot's ElfLdr2 libs folder.
- librnalindbergh_jr.so
- libcri_soundoutput_lindbergh_jr.so
- Primeval Hunt\disc0\prog => TeknoParrot\ElfLdr2\libs
- Apply Nezarn's Shader Fix available in the #fixes channel in the TeknoParrot Discord.
Rabbids Hollywood Arcade
- Game File Name: game.exe
- Requires the Trigger Fix, which can be found in the #fixes channel in the TeknoParrot Discord.
- Refer to the ReShade workaround if you have issues loading the ReShade menu screen when pressing the Home key.
Rambo
- Game File Name: ramboD.elf
- Resolution Width = 1360
- Resolution Height = 768
- Display Mode = Fullscreen Windowed (Not sure if Res change is required??)
AMD Shader & Crashing Issues:
- Download and apply Foxhole's Shader Fix
- Enable AMDFix in TeknoParrot's Rambo Game Settings.
Nvidia Shader Issues:
- Apply Nezarn's Shader Fix available in the #fixes channel in the TeknoParrot Discord.
- This shader fix was created for older NVIDIA cards.
Sega Dream Raiders
- Game File Name: game.exe
- Download No Crosshair Patch by Argonlefou from Mega.nz
- Lag Fix: If you are experiencing extreme lag when moving the crosshairs across the screen, edit the Game.ini file and set ENABLE_VSYNC 0
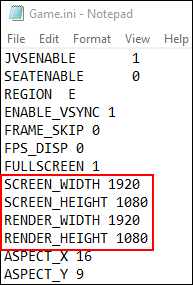
- Fullscreen Fix: Edit the Game.ini file to match your screen's resolution.
Sega Golden Gun
- Game File Name: RingGunR_RingWide.exe Located in the Golden Gun\exe\ Folder
- Download No Crosshair Patch from Mega.nz
- Enable FreePlay or map Coin 1 and Service 1 to the same button.
Star Trek Voyager
- Game File Name: trek.e4
- Linear Filtering = Enabled
- Line Fix = Enabled
- Limit 30FPS = Enabled
- Depending on where you get the game from, you may need to add some files from a CHD or even download it as a CHD. You can extract the files of the CHD using the following method:
- Get voyager.chd from MAME
- Extract the chd with "chdman extracthd --input voyager.chd --output voyager.bin"
- Open bin file in 7zip
- Extract disk3 to a folder, And extract the following folders to that same folder:
- \disk0\home\rocky\stv
- \disk2\stv
- NOTE: Allow the game to load until you get to the title screen. The game can crash if you enable the Sinden border too soon.
Target Terror Gold
- Game File Name: game
- Takes a long time to boot
Terminator Salvation
- Game File Name: game
- Confirmed working version for for both game & hasp is v1.25
- Use Nomousy to hide the mouse cursor.
Crosshair Removal
- Disable (uncheck) ForceReticle in TeknoParrot's Terminator Salvation Game Settings menu.
- Launch the game and press the Test Button.
- Go to Operator Adjustments > Game Adjustments > Change Shooting Mode to Default or Tracer Only
Time Crisis 5
- Game File Name: RSLauncher.exe
- Crosshair render hook = Present
Tomb Raider
- Game File Name: game.exe
- Requires the Trigger Fix, which can be found in the #fixes channel in the TeknoParrot Discord.
- Refer to the ReShade workaround if you have issues loading the ReShade menu screen when pressing the Home key.
- NOTE: Aim will only be correct using a resolution of 1920x1080.
- Windows registry edit is required if you have previously launched the game in another resolution.
- Right-click on the Windows Start button > Run > type in regedit > OK
- Navigate to Computer\HKEY_CURRENT_USER\SOFTWARE\Sarbakan\SquareEnix_TombRaider
- Right-click on Screenmanager Resolution Height > Modify > Edit the Decimal Value Data to 1080.
- Right-click on Screenmanager Resolution Width > Modify > Edit the Decimal Value Data to 1920.
Transformers - Human Alliance
- Game File Name: TF_Gun_R_Ring_dumped.exe Located in \exe\ folder
- Enable FreePlay or map Coin 1 and Service 1 to the same button.
No Crosshairs Patch
Download from Mega.nz
QTE Buttons
The buttons required for the QTE events in the game are Player 1 & 2 Start, so make sure you set both buttons to P1's gun if you are playing solo.
Stage 3 Crash Fix
If the game crashes for you on stage 3 due to out-of-memory errors, download the NTCore 4GB Patch from the TeknoGods' GitHub wiki site and patch the TF_Gun_R_Ring_dumped.exe file.
Wartran Troopers
- Game File Name: game.exe
- NOTE: Using ReShade for the border can cause the game to display in split screen.
