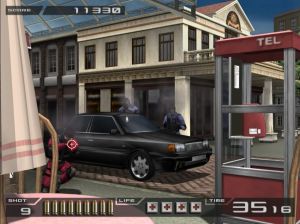
PCSX2
PCSX2 is an open-source PlayStation 2 emulator for Windows and Linux. Since 2016, it has also supported the PlayStation 2's backward compatibility mode for PlayStation games.
- NOTE:Windows 7 compatibility was officially removed once emulator's development moved to the "version 1.7" state and beyond, so stable release 1.6.0 is the very last one to work on your OS if you still use 7 instead of 10 or 11.
Version 1.6.0 and 1.7.0 require a different process to get lightguns working.
PCSX2 1.6.0
Downloads
- Download PCSX2 from the PCSX2 website. Download the latest stable 1.6.0 version. (1.7.0 Nightly versions don't work with Nuvee).
- It is recommended to use the portable version of PCSX2 v1.6.0 (pcsx2-v1.6.0-windows-32bit-portable.7z)
- DO NOT use an existing PCSX2 installation.
- Download Nuvee plugin from Mega.nz (it's named Nuvee - 10-21-2011). This plugin allows using lightguns/mice with PCSX2)
Installation
- Install or extract (portable version) the emulator as you normally would.
- DO NOT launch the pcsx2.exe file until you follow the steps below add the nuvee plugin and create the inis folder.
- Extract the nuvee plugin:
- Inside the nuvee folder you will have 5 folders; the folder that we need is named: nuvee_ps2_usb - guncon2, keyboard, mouse
- Access that folder and inside the bin folder is a file named nuvee_ps2_usb.dll. Copy & paste the dll file into the PCSX2\Plugins folder
- Create a folder named inis inside of the root PCSX2 folder -> PCSX2\inis
- Start the PCSX2 emulator and configure PCSX2 to use the new nuvee plugin that we just placed by going into Config -> Plugin/BIOS Selector -> Plugins
- Set the USB plugin to nuvee ps2 usb and press OK
- If you haven't done so yet, please start the Sinden software and start the gun/s
- Now, go to Config -> USB -> Plugin Settings, and in the window that has just been opened, make sure that HID Mouse API is set to RawInput, check Snap mouse cursor to window and Swap lightgun players 1-2 if necessary
Note: Once in the game, on the calibration screen, check which player is being calibrated. Toggle the Swap lightgun players box if necessary.
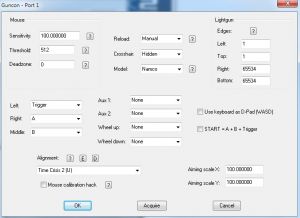
- Set Port 1 to Guncon 2 and click Config; once inside the configuration window, click Acquire and follow the instructions.
- You can set the reload method there to either Manual (Offscreen shot) or Semi (Just move the gun offscreen) and either have crosshair Visible or Hidden (crosshair Hidden is recommended)
- You will have to set the profile for the game you want to play before starting; at the picture above it is set to "Time Crisis 2 (U)".
- If you have no profiles to select, download the profile ini file from Mediafire and put it in the PCSX2\inis folder
- To perform the in-game calibration, you must check Mouse Calibration Hack, until you finish the in-game calibration, which then you should pause the game using Esc and uncheck Mouse Calibration Hack. (You can resume the game using the Resume function under System)
- A good way to avoid having to redo the mouse calibration each time you want to play is to do it once, save state using F1 key, and from there on to leave Mouse Calibration Hack unchecked and just load state when you start the game.
- Next step would be to go to Config -> Video (GS) -> Window Settings and make sure that Double-Click toggles fullscreen mode is unchecked; other options are a matter of preference.
Game Specific Notes
Time Crisis - Crisis Zone US fix
Tips for getting Time Crisis Crisis Zone's machine gun to work properly. Provided by Zed Alistar
Note: This is only for the US version. EU version does not suffer from this issue.
Time Crisis Zone US. Hooo boy, the US one has a bit of a problem after calibration
When attempting to shoot full auto, the gun empties its magazine but doesn't unload the bullets where you're pointing.
Only the first bullet hits. After that, you're wasting ammo.
Found a fix for this via awesome forum website.
This issue is linked to the "Mouse Calibration Hack" checkbox in P1 or P2 config of Nuvee :
- If checked, you can calibrate the guns when the game asks you to at the start. But autofire is not working
- When unchecked, you can't calibrate the guns - and so can't go past the calibration screen - but autofire is working
So what I did to trick the system :
- On the main window, open Config -> USB -> Plugin Settings... window Set Port1 to None Set Port2 to None Check Swap lightgun players 1-2
- Load Crisis Zone game; it will load straight to the main title screen without going through the calibration menu. But you can't control anything yet
- Go back to the main window, open Config -> USB -> Plugin Settings... window Set Port1 to Guncon2 Click Config button for Port1 Uncheck Mouse Calibration Hack Set your buttons as usual (for pedal, etc...just like for time crisis 2 &3 ), acquire the gun if needed Select the Crisis Zone profile for alignment/plugin calibration Click OK button
- Back to USB Nuvee plugin config, set Port1 to Guncon 2 and check Reconnect USB devices (PS2 Detection) Click OK button This should force the Gun to be recognised, and this time autofire will work! But as you'll see, calibration is completely off
- To make things easier, make a savestate of your game (press F1 to save to slot 0)
- Use impacts when firing on the title menu screen to calibrate the game by changing values in the corresponding profile in nuvee_ps2_usb_guncon_profiles.ini Open the nuvee_ps2_usb_guncon_profiles.ini file with a text editor Find the Crisis Zone section or add itThere are four numbers you need to focus on, and those are right under the game name, exactly in order, they represent (screen width) (height width) (horizontal aim) (vertical aim). Increasing the number for screen width, and height width makes the gun think you're on a bigger screen than you actually are; lowering them makes it smaller than you actually are. Recommended to not touch whatever your values are. Now, horizontal and vertical aim are where you want to mess around with: Increase horizontal aim to make the gun shoot more to the right. Lower it to shoot more to the left. Increase vertical aim to make it aim downwards. Lowering it makes it go upwards. Take the time to fiddle around the numbers until it aligns perfectly with your scope You should have no problems from there. Remember to use save states to prevent this from happening again
time_crisis_zone_ui "Time Crisis - Crisis Zone (U) (480i)"
90.25 97.5 420 135 ; Edit these values for calibration
namco 640 240"
- Now, your gun should be calibrated, and autofire should work. To use it now, and bypass the whole NoDevice-Guncon swap thing, just keep the final Nuvee configuration, load the game and press F3 to load the savestate
- You can now save inis files if you want to swap Nuvee configs with AHK scripts, and you can implement an auto F3 keypress a few seconds after launching the emulator to load the CirsisZone Savestate by the script
Dino Stalker nuvee configuration
(Shared by Moleburt in Discord)
Here is the only setup I’ve found that allows you to play the game with basically complete controls:
Since as is with nuvee you can’t use ahk to remap keys, you can’t use the aux buttons with the Sinden (aux buttons are mouse buttons 4 and 5), and you can’t map the wheel up and down buttons to anything with the Sinden because of the way nuvee works.
- Map Left click as Trigger
- Right Click as A or B
- Middle as A or B (depending on what you chose for right click)
- Make sure the “WASD” box is checked in nuvee; when it’s checked, it makes Q start on your keyboard, E select, and F is the C button.
You can then use ahk to remap the WASD to your Sinden d-pad, as well as change Q, E, and F to keys that work for you, or just use a keyboard for start and select
C is the only button you really need to add to your gun for the game. When you do this, you can’t do a traditional reload, but switch guns in the game with C auto reloads for you. This was the best solution I came up with, it was either this or don’t map either A or B and map reload still, which makes it so you can’t strafe 1 direction in game and you can’t pull up the snipe shot, because it requires A and B to be held together. Hopefully, in the future, someone will come up with a better way.
Gunfighter II: Revenge of Jesse James
For some user the game is crashing in the video 3 seconds after it has been launched.
- One fix is to disable frameliting. Go to Config > Video (GS) > Core GS Settings > GS panel > then set "Disable Framelimiting" as shown in the image below:
- If it's not working you can re-enable framelimiting and use the "Skip MPEG hack". Go to Config > Video (GS) > Core GS Settings > Game Fixes panel > then set "Skip MPEG hack" as shown in the image below:
Virtua Cop Elite special setup
To make selections in Virtua Cop Elite, you must enable "Use the keyboard as D-Pad (WASD)" in the Nuvee settings.
Then remap W.A.S.D buttons to Up, Down, Left, and Right using AHK to match your gun's DPAD button assignment.
- Note: This game experiences input delay. Playing the arcade version (Model 2) is recommend.
- Start = Q on your keyboard, Select = E, and C Button = F
- In the Nuvee settings, you need to map Right to Reload to be able to shoot offscreen and get past the calibration screen.
Tool to save configurations for each game in PCSX2
- Download AutoHotKey from the AutoHotKey website and install it
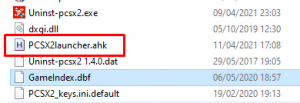
- Create a new text file in your PCSX2 folder; name it PCSX2launcher.ahk or the name of your choice. Make sure the extension is .ahk and not .ahk.txt. (How to show file extensions)
- Edit this file with a text editor like notepad and paste the following script inside
#NoEnv  ; Recommended for performance and compatibility with future AutoHotkey releases.
SendMode Input  ; Recommended for new scripts due to its superior speed and reliability.
SetWorkingDir %A_ScriptDir%  ; Ensures a consistent starting directory.
#SingleInstance Force ; Determines whether a script is allowed to run again when it is already running.

; Tool to save per-game configurations for PCSX2
; Written for the Sinden Lightgun community

;initialization
;grab the script parameter if any was provided
game = %1%

;check if the parameter was an iso name (Launchbox) and convert this to the right game name
if (game != "")
{
	iniread, isoname, %A_Scriptdir%\pcsx2launcher.ini, isonames, %game%
	if (isoname != "") && (isoname != "ERROR")
	{
		game := isoname
	}

	gamecheck := game
	splitpath, gamecheck, gamecheck
	gamecheck := SubStr(gamecheck,  1, InStr(gamecheck, ".") -1)

	iniread, isoname, %A_Scriptdir%\pcsx2launcher.ini, isonames, %gamecheck%
	if (isoname != "") && (isoname != "ERROR")
	{
		game := isoname
	}


}
;read the ini or create it
if !FileExist(A_ScriptDir "\pcsx2launcher.ini")
{
	IniWrite, pcsx2.exe, pcsx2launcher.ini, default, emuexe
	IniWrite, --fullscreen --nogui, pcsx2launcher.ini, default, pcsx2flags
}

IniRead, emuexe, pcsx2launcher.ini, default, emuexe, pcsx2.exe
IniRead, flags, pcsx2launcher.ini, default, pcsx2flags, --fullscreen --nogui

if !FileExist(A_ScriptDir "\gameconfigs"), "D"
	FileCreateDir, %A_ScriptDir%\gameconfigs

if !FileExist(A_ScriptDir "\" emuexe) ; Check if we are in the PCSX2 folder
{
	Msgbox,, Error, %emuexe% not found. Please run this tool from the PCSX2 folder or update your pcsx2launcher.ini file.
	ExitApp
}

;Check if we are trying to run a game (config folder exist) or set up a new game (no config folder or script run without paramenters)
if (game < 1) || !FileExist(A_ScriptDir "\gameconfigs\" game "\game.ini") ; if there are not parameters or the ini doesnt exist
	goto SetUP ;we want to set up a new game
else
	goto RunGame ;we want to run a game
ExitApp

SetUP:
FileRead, iso, %A_ScriptDir%\inis\PCSX2_ui.ini  ; read the PCSX2 ini to find the last used iso
loop, parse, iso, `n, `r
{
	StringSplit, m, A_LoopField, =
	if (m1="CurrentIso")
		iso := m2
}

if (iso != "") && (game < 1) ; either grab the game name from the parameter passed to AHK or the iso name
{
	iso := StrReplace( SubStr(iso,  InStr(iso, "=") + 1), "\\", "\")

	splitpath, iso,isoname
	isoname := SubStr(isoname,  1, InStr(isoname, ".") -1)
	game := isoname
	game := StrReplace( SubStr(game,  1, InStr(game, ".") -1), " ", "_")
	game := StrReplace( game, "(", "")
	game := StrReplace( game, ")", "")
}
if (iso = "" )
	iso := "Your game iso with full path"
if (game = "")
	game := "Game name (no spaces)"

Gui, Add, Text, x42 y120 w430 h20 , Game name (name of the config folder, no spaces):
Gui, Add, Edit, x42 y140 w430 h20 vgame, %game%

Gui, Add, Text, x42 y190 w430 h20 , Game iso location and filename:
Gui, Add, Edit, x42 y210 w430 h20 viso, %iso%

Gui, Add, Text, x42 y260 w430 h20 , Program to run before PCSX2 (Pedals`, drivers`, etc):
Gui, Add, Edit, x42 y280 w430 h20 vappatlaunch, none
Gui, Add, Text, x42 y310 w430 h20 , Parameters for this program (leave empty for none):
Gui, Add, Edit, x42 y330 w430 h20 vappatlaunchparams,
Gui, Add, Text, x42 y360 w140 h20 , Close it after closing PCSX2:
Gui, Add, CheckBox, x182 y358 w20 h20 vcloseappatlaunch,

Gui, Add, Text, x42 y410 w430 h20 , Program to run after closing PCSX2 (Pedals`, drivers`, etc):
Gui, Add, Edit, x42 y430 w430 h20 vappatquit, none
Gui, Add, Text, x42 y460 w430 h20 , Parameters for this program (leave empty for none):
Gui, Add, Edit, x42 y480 w430 h20 vappatquitparams,

Gui, Add, Button, x132 y520 w100 h30 default, &OK
Gui, Add, Button, x292 y520 w100 h30 , Cancel
Gui, Font, S12 CDefault, Verdana
Gui, Add, Text, x32 y19 w450 h80 , If you haven't done it yet`, run PCSX2`, configure all your settings including nuvee options. Then run the game`, complete calibration and save the state (F1).  Close PCSX2 and re-run this script.
; Generated using SmartGUI Creator for SciTE
Gui, Show, w518 h580, PCSX2 per game config creator GUI
return

ButtonOK:
Gui, Submit
game := StrReplace( game, " ", "_")
if (closeappatlaunch = 1)
	closeappatlaunch := "yes"
else
	closeappatlaunch := "no"

;MSgbox, setting the ini as follows:`r`nGAME: %game%`r`nISO: %iso%`r`nprogram at launch: %appatlaunch%`r`nclose it: %closeappatlaunch%`r`nprogram at quit: %appatquit%

if !FileExist(A_ScriptDir "\gameconfigs\" game), D
	FileCreateDir, %A_ScriptDir%\gameconfigs\%game%

;write the values from the GUI to the game.ini
IniWrite, %iso%, %A_ScriptDir%\gameconfigs\%game%\game.ini, default, iso
IniWrite, %appatlaunch%, %A_ScriptDir%\gameconfigs\%game%\game.ini, default, appatlaunch
IniWrite, %appatlaunchparams%, %A_ScriptDir%\gameconfigs\%game%\game.ini, default, appatlaunchparams
IniWrite, %closeappatlaunch%, %A_ScriptDir%\gameconfigs\%game%\game.ini, default, closeappatlaunch
IniWrite, %appatquit%, %A_ScriptDir%\gameconfigs\%game%\game.ini, default, appatquit
IniWrite, %appatquitparams%, %A_ScriptDir%\gameconfigs\%game%\game.ini, default, appatquitparams
Iniwrite, %game%, %A_ScriptDir%\pcsx2launcher.ini, isonames, %isoname%


FileDelete,  %A_Scriptdir%/inis/game.ini
FileCopy, %A_Scriptdir%/inis/ , %A_Scriptdir%/gameconfigs/%game%/*.* , 1

Gui, 2:Font, S10 CDefault Bold, Verdana
Gui, 2:Add, Text, x25 y19 w540 h130 , The configuration has been saved.`n Run this command: `n`n  %A_Scriptname% %game% `n`n to run your game with the saved settings.
Gui, 2:Add, Button, x102 y179 w140 h30 default, &Close
Gui, 2:Add, Button, x322 y179 w160 h30 , Run the game now
; Generated using SmartGUI Creator for SciTE
Gui, 2:Show, w594 h239, Configuration Saved GUI
return

2ButtonClose:
ExitApp

2ButtonRunthegamenow:
gui, 2:hide
gosub RunGame

ButtonCancel:
ExitApp

GuiClose:
ExitApp

RunGame:
; Read the ini file for our game
IniRead, iso, %A_Scriptdir%/Gameconfigs/%game%/game.ini, default, iso ; read the iso name from the ini
IniRead, appatlaunch, %A_Scriptdir%/Gameconfigs/%game%/game.ini, default, appatlaunch, none ; read the program to run before the game
if (appatlaunch = "")
	appatlaunch := "none" ; make sure that an empty value is treated the same as none

if (appatlaunch = "none") ; if no program to launch we dont need to close it, set it to no
	closeappatlaunch = "no"
else
{
	IniRead, closeappatlaunch, %A_Scriptdir%/Gameconfigs/%game%/game.ini, default, closeappatlaunch, no ; does it need to be closed after the game
	IniRead, appatlaunchparams, %A_Scriptdir%/Gameconfigs/%game%/game.ini, default, appatlaunchparams,
}
IniRead, appatquit, %A_Scriptdir%/Gameconfigs/%game%/game.ini, default, appatquit, none ; read the program to run after finishing the game
IniRead, appatquitparams, %A_Scriptdir%/Gameconfigs/%game%/game.ini, default, appatquitparams,

if (appatquit = "")
	appatquit := "none"

;copy the ini files to the main folder
FileCopy, %A_Scriptdir%/gameconfigs/%game%/*.*, %A_Scriptdir%/inis/ , 1

; run all the things
if (appatlaunch != "none")
{
	SplitPath, appatlaunch, , launchpath
	run, `"%appatlaunch%`" %appatlaunchparams% ,%launchpath%,, atlaunchPID ;run the at launch app from its own dir
}
run, `"%A_Scriptdir%/%emuexe%`" `"%iso%`" %flags%,,, pcsx2PID ; Run PCSX2 with the flags from the ini file
sleep 300
WinActivate, ahk_exe %pcsx2PID%
sleep 10000
Send {F3 Down} ; Load the Savestate
Sleep, 100
Send {F3 up}


; close PCSX by pressing ESC
$ESC::
if (appatlaunch != "none") && ((closeappatlaunch = "yes") || (closeappatlaunch = "1"))
		process, close, %atlaunchPID%

Process, Close, %pcsx2PID% ; quit PCSX2 by PID
sleep 200

if (appatquit != "none")
{
	SplitPath, appatquit, , quitpath
	run, `"%appatquit%`" %appatquitparams% ,%quitpath% ;run the at quit app from its own dir
}
ExitApp
- Save the changes.
Configuration
- Run PCSX2, configure your settings, nuvee, graphics, game patches, controls, etc.
- Select the game ISO and run the game in PCSX2
- Follow the instructions in this wiki to get past the calibration screen
- Save the game state (press F1)
- Close PCSX2
- Run (double click) PCSX2launcher.ahk
- Fill/change the fields as needed for your game, iso location, and programs that you need to run before and/or after PCSX2 (e.g., your pedal configuration software)
- If you don't need to run any programs before/after PCSX2, leave the values as "none"
- Once you save the configuration, you can Close the program or Run the game to test the configuration you have just created
- Repeat the process for each game that requires a specific configuration
- The script creates a ini file inside the PCSX2 folder: PCSX2Launcher.ini. You can change your PCSX2 executable name and flags (e.g. --fullscreen) inside this file
How to run games without a frontend
To run PCSX2 with a specific game configuration, run the script followed by the name of the game (the first value you used during config) from the command line shortcut.
- Press ESC to quit the game
How to run games via Launchbox
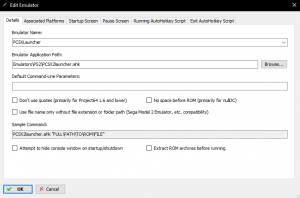
- Configure PCSX2Launcher as an emulator with the settings below:
- PCSX2Launcher keeps track of the iso names when you save the configuration (saves them in the PCSX2Launcher.ini file). If an iso name is provided as a parameter, it will try to match it to one of the existing configuration folders inside the gameconfigs folder and continue as if the folder name was the parameter provided.
How to delete a configuration
- Delete the game folder inside gameconfigs
- Delete the corresponding iso path inside the [gameisos] section of the PCSX2Launcher.ini file.
PCSX2 1.7.0 and later
Note: Requires the Sinden lightguns to be updated to the version 1.9 firmware and 2.05 beta Sinden software. Joystick Movement must be enabled in the Sinden v2.05 beta software.
Lightgun functionality has recently been updated by the PCSX2 devs with raw input support and is still being tested for any issues.
If you have any issues with version 1.7 it is recommended to revert back to PCSX2 1.6.
Downloads
Download the latest nightly build from the PCSX2 website - Raw Input support was added as of version 1.7.4314 - as these are nightly builds features are subject to change and bugs are likely.
Installation
- Install the emulator as you normally would, if you need a guide please refer to the PCSX2 wiki
Gun Configuration
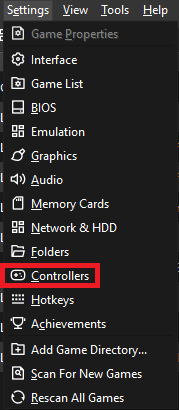
- Open the Settings menu and select Controllers
- Under Controllers tick the "Enable SDL Raw Input" option
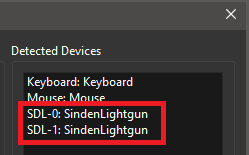
- If you have your gun(s) plugged in they should show on the right hand side of this screen
- If they do not ...
- Make sure that the Joystick Movement option has been enabled in the Main tab of the Sinden v2.05 beta software (requires firmware v1.9).
- And Enable Joystick Device for each gun on the Firmware Upgrade tab.
- NOTE: A 16:9 border should be used when operating in Joystick mode.
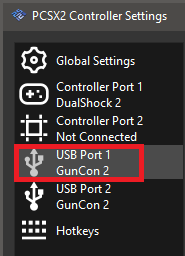
- Select USB Port 1 on the left hand menu
- Change the dropdown menu to GunCon2
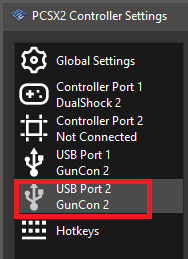
- Select USB Port 2 on the left hand menu
- Change the dropdown to GunCon2
Configure Buttons
These bindings will work for basic game setup such as Time Crisis 2 or Vampire Night. More complex setups such as Resident Evil: Dead Aim have not yet been tested.
Bind the buttons appropriate for your setup
- NOTE: Recommend to map the Calibration Shot input to a different button than what you have mapped for Trigger. Mapping Calibration Shot to the same button as Trigger can cause input delay. See Calibration section below.
- Example bindings for USB Port 1 (P1)Select each key in turn and map them matching to your gun setup
- Example bindings for USB Port 2 (P2) 2 Player setup note: it appears there is a bug with the raw input implementation. When mapping left, middle and right mouse clicks they will be used by both guns so when one person shoots, they both shoot. To get around this setup a separate Sinden software folder and change left. middle and right mouse click to available keys on your keyboard.
- If using Joystick mode, you must also map the axes in the Relative Aiming section.
Remove Cursor
This will need to be done on each game
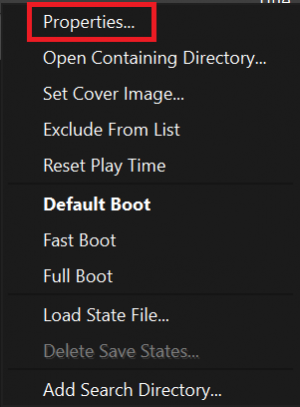
- Right click on game
- Select Properties
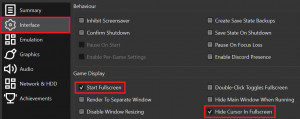
- In Properties menu go to Interface
- Tick "Start Fullscreen"
- Tick "Hide Cursor in Fullscreen"
Calibration
- Recommend to map the Calibration Shot input to a different button than what you have mapped for Trigger.
- At the calibration screen, aim at the targets with your lightgun and press the button that you mapped to Calibration Shot.
- After passing the calibration screen, you can create a save state to avoid having to calibrate again.
Example AHK launch script
#NoEnv  ; Recommended for performance and compatibility with future AutoHotkey releases.
; #Warn  ; Enable warnings to assist with detecting common errors.
SendMode Input  ; Recommended for new scripts due to its superior speed and reliability.
SetWorkingDir %A_ScriptDir%  ; Ensures a consistent starting directory.

Run, D:\PS2\pcsx2\pcsx2-qt.exe "D:\PS2\TIMECRISIS2.iso", D:\PS2\pcsx2
Sleep 5000

Esc::
Process, Close, pcsx2-qt.exe
Run,taskkill /im "pcsx2-qt.exe" /F
ExitApp
Games
| Game Name | Notes |
|---|---|
| Cocoto Funfair | |
| Death Crimson OX+ (Japan) / Guncom 2 (Europe) | |
| Dino Stalker aka Gun Survivor 3: Dino Crisis | |
| Endgame | |
| Gunfighter II: Revenge of Jesse James | |
| Gunvari Collection + Time Crisis | |
| Ninja Assault | |
| Resident Evil Survivor 2 Code: Veronica / Gun Survivor 2 Biohazard Code: Veronica | |
| Starsky & Hutch | |
| Time Crisis: Crisis Zone | |
| Time Crisis 2 | |
| Time Crisis 3 | |
| Vampire Night | Turn off mouse calibration when in-game to avoid missed shots/reloads |
| Virtua Cop: Elite Edition / Virtua Cop Re-Birth |
| Game Name | Notes |
|---|---|
| Police 24/7 (Norgun)(EUR/JAP Only) | Requires HyperBlaster/Multi Gun and Konami Capture Eye camera |

